Friday, August 31, 2018

Why Tempered Glass is not stronger than Gorilla?

Glass is not understood as most materials, because it straddles the line between liquid and solid.
It is important to protect touch screens as phones don’t function properly if their screen are damaged.

Tempered Glass: Tempered glass is about four times stronger than "ordinary," or annealed, glass. Its made by heating the glass and then cooling it very quickly. It breaks differently than normal glass. A tempered glass screenguard is a multi-layered screen protector.

a) Oleophobic Coating: protect against fingerprints, smudges, oils and over lubricants.

b) Tempered glass

c) Shatter-Proof layer

d) Silicone layer: In case of damage of the tempered glass it keeps small pieces from falling out .

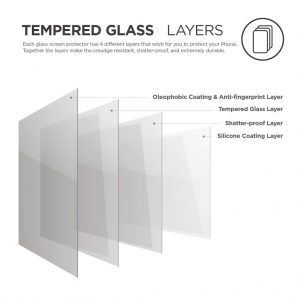
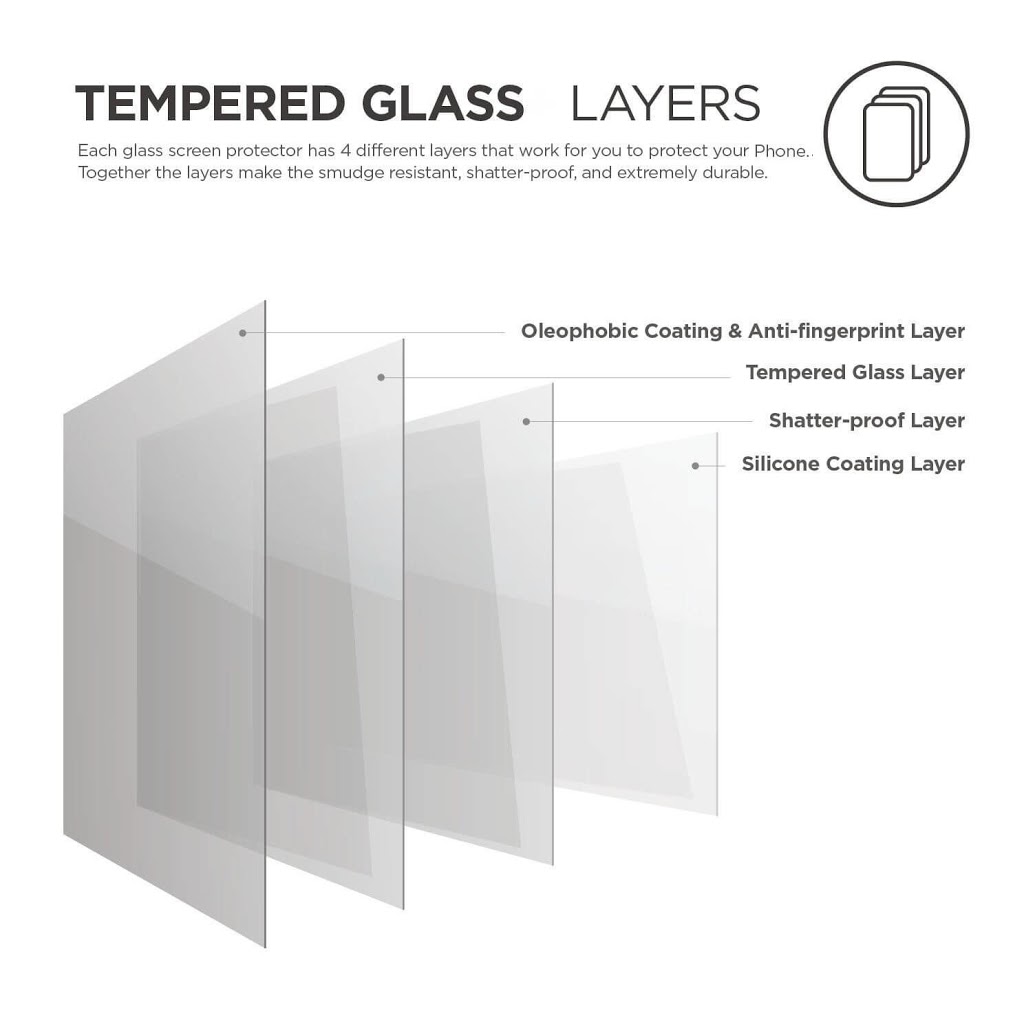
There is an Additional layer of Protective membrane to protect the glue from dust. All these layers make tempered glass up to five times stronger than normal glass.

Process how its made:


a) Glass is purchased in big sheets. Each big sheet is cut in to rectangular pieces.

b) CNC Machine is used to  cut to the big sheets to the designed size of phones. The 2.5 D edge curve is also formed at this step.

c) The glass is then examined for imperfections that could cause breakage at any step during tempering. An abrasive such as sandpaper removes sharp edges off the glass.

d) The glass is washed to remove any grains or dirt deposited.

e) After washing it begins a heat treatment process in which it travels through an oven containing a Potassium Salt (KCl) at ~600 °C (Industry standard is 620 °C) for 6-7 hours. The glass then undergoes a high-pressure rapid cooling procedure called "quenching" causing the outer surfaces of the glass to cool and contract faster than the center giving the tempered glass its strength.

Finally the Tempered Glass which we see often in the mobile shops is manufactured like this.

What Is 9H Hardness in Tempered Glass?


9H Hardness refers to the screen not getting scratched by a 9H pencil, the toughest of all standard pencils. This strength can be reached only if the heating lasts for at least 6-8 hours. Some manufactures try to save time and cut this process to 3-4 hours. As a result the glass does not reach required toughness.

So till now we have understood about how the tempered glass is made and the next time if we purchase a tempered glass for our mobile, we will ensure it should have "9H hardness" mentioned on its cover.


Gorilla Glass:


We all have heard the term Gorilla Glass. Corning® Gorilla® Glass is used in the mobile smartphones, tablets, slates, notebooks, wearables and tablets. It has been in the market from past several years and is present in 6 billion devices across 45 major brands. Its a relatively perfect fit for touch-screen handsets. But do you actually know what's special about it? Lets check:

The reality is that its not made of Gorillas. Most modern device manufactures use Corning's Gorilla Glass for protecting their devices touch. Its manufactured by the brand Corning. Objective of Gorilla Glass is to make the cell phone devices getting slimmer, lighter, curvier & durable.

Its main benefits are:

a) Crystal Clarity.

b) Easier to Clean.

c) Highly Scratch Resistance.

d) Harder to Break.

e) Thinner.

f) Flexible to a certain degree.

Process how it is made:


a) The process begins when raw materials are blended into a glass composition and melted.

b) This molten glass is drawn down to form a continuous sheet of flat glass that is so thin & is measured in microns. The glass is untouched by human hands or anything else that will introduce flaws into the surface.

c) The glass sheet is now drowned into hot molten solution of Potassium Salt at ~ 400 °C. This process leaches small sodium ions out of the glass and replaces them with larger potassium ions. During this process as the glass sheet cools, the large particles squeeze the sheet inwards from outside, producing compressive stress on the surface of the glass.

d) Finally these large Potassion Ions are pressed together, producing a layer of compressive stress on the surface of the glass which makes it more resistant to damage and we get Gorilla Glass.

Compressing the surface of the glass makes it stronger and helps to resist scratches and breakproof at a certain degree. In order to break a Gorilla Glass screen, a flaw would have to penetrate through the compressive layer and the tension layer.

Versions of Gorilla Glass:

  1. Gorilla Glass 6

  2. Gorilla Glass 5

  3. Gorilla Glass 4

  4. Gorilla Glass 3

  5. Gorilla Glass

  6. Gorilla Glass DX, Gorilla Glass DX+

  7. Antimicrobial Gorilla Glass

  8. Vibrant Corning Gorilla Glass


Popular Devices using Corning Gorilla Glass: Samsung Galaxy S9, Samsung Galaxy S9+,OnePlus 6 and many other devices.

Recent Update by Corning:

On JULY 18, 2018 Corning Incorporated announced two additions of cover glass innovations - Corning® Gorilla® Glass DX and Corning® Gorilla® Glass DX+. Both of these feature an antireflective property that vastly improves optical clarity and superior scratch resistance while maintaining the legendary toughness and touch sensitivity of Gorilla Glass.

It depends entirely on you. Gorilla Glass won't protect your device from everything and is hard enought but still could break. But it will add a layer of tempered glass protection for your phone, which, in turn, will help avoid costly screen repairs of replacing the touch. After all, it is easier (and cheaper) to replace a tempered glass protection compared to a gorilla glass display.

Read More about Tempered Glass: Click Here

Thanks a ton for reading my above blog.

Next Blog:  Paytm's Made In India AI Cloud; Amazon, Google oppose Data Localisation!

Ajey Kumar Gupta
(Microsoft Exchange Admin).

Thursday, August 30, 2018

Servers...Never stops? Why Server are required to run 24x7?

A server is engineered to store, manage and process data 24 hours a day, 7 days a week, 356 days a year. Hence, servers need to be far more reliable then our regular desktop or laptop systems. While almost any PC that meets the minimum hardware requirements can run the server operating system, but that doesn't make it a true server. Servers offer a variety of features not typically found in a desktop PC.

There is a specialized hardware for the Servers. It must be robust, as it would be working 24x7 providing requests to the clients. Memory used in the Servers are of very high grade. Hard Drives used for storage are much faster & durable than traditional desktop pcs.

RAID Technology is used for storing the same data on multiple hard disks to increase Read Performance and Fault Tolerance. Hence data remains safe. 

If you have uploaded a photograph on Facebook long time ago, you will always find it there and has very less probability of getting it deleted. For redundancy, data is replicated to different data-centers of located in different countries as well, so your data is always safe in the cloud. There is always a best match of hardware inside the servers.

Ever wondered how a real bunch of physical servers looks like:


What's different inside the servers than normal desktops/laptops:

a) Dual processors for faster processing of data.
b) Redundant hard drives and power supplies.
c) Hot swappable components.
d) Could be scalable; to meet current, as well as future needs.
e) Can process data faster and more efficiently.

Servers play a vital role helping us fulfill our day to day needs. A server's responsibility is always to serve its client. When a server fails to serve its client, we call it as server crashed or server down.

Lets understand it with a practical example, as you are reading this blog, the contents of this blog are fetched from website running on Google Server and as you know Server is always on, you can access it anytime from anywhere in the world and give it a quick read.

Common types of Servers used  in organizations are:
a) Mail Server: it stores users e-mail accounts and help them send & receives e-mail messages.e.g, Gmail or Hotmail.
b) Web Server (Microsoft IIS, Apache,Nginx): it provides content saved on a disc in the form of website URL.
c) Collaboration Server (Microsoft Sharepoint).
d) Database Servers (Microsoft SQL, MySQL, MariaDB).
e) Proxy Server: A proxy server sits between a client program (typically a Web browser) and an external server (typically another server on the Web) to filter requests, improve performance, and connect to the internet.

How do we access Websites?
Mostly websites are being hosted on Web Hosting Service providers on the internet. They have installed physical servers in their datacenters premises and have scaled them so vast that hundreds of individual websites can be hosted on their servers. It saves huge infrastructure cost & maintenance for the companies taking services from them at a nominal price.

In today's world whatever we are doing on the internet is handled by Servers at backend physically running somewhere in any part of the world. The companies which own these Datacenter Servers maps it using an easy to remember hostnames like Google.com, Facebook.com, Amazon.in etc. If you are calling on a Skype, chatting on Whats App, posting pictures on Facebook, all activities happening at backend are taking place on their respective application server.

Thanks a ton for reading my above blog. I hope it would have been clear about how servers provide us so many services in our day to day life.

Read More on Servers: Click Here

Thanks,

Ajey Kumar Gupta
(Exchange Server Admin).

Next Blog: Why Tempered Glass is not stronger than Gorilla?

Tuesday, August 28, 2018

JioGigaFiber: The Next Generation Broadband Service

Reliance Chairman Mr. Mukesh Ambani on July 5, 2018 launched its fiber based broadband service - JioGigaFiber in India. Registration started from 15th August 2018 in more than 1100 cities.

What is JioGigaFiber?

Jio GigaFiber is basically a broadband service by Jio provided using a flexible Fiber Cable. When data has to travel long distance, fiber optic cables experience less signal loss than copper cabling.

Currently Jio is offering its "JioGigaFiber preview offer" which gives speed up to 100Mbps for 3 months with 100GB monthly data and no Installation Charges. There is a Refundable Security Deposit of Rs 4,500 taken initially for the Jio Router (ONT device) and can be paid easily through Debit card, Credit Card, Jio Money or Pay TM.

Jio GigaFiber plans and prices:

In media, it's being suggested that Jio GigaFiber plans for 1 month subscription (first 3 months free) would be:

a) Rs 500 plan will give 300 GB data with 50 Mbps.
b) Rs 750 plan will give 450 GB data with 50 Mbps.
c) Rs 999 plan will give 600 GB data with 100 Mbps.
d) Rs 1299 plan will give 750 GB data with 100 Mbps.
e) Rs 1500 plan will give 1000GB data with 150 Mbps.

What will you get when you open JioGigaFiber box?

a) Jio Router (Color White) - will have 3 Lan Ports (RJ45), 1 Telephone Port (RJ11), 2 USB Ports, 1 Fibre cable Input port.


b) Fibre cable for Input to Jio Router.


c) Charger for the Jio Router.

Features of Jio Gigafiber:

a) Provide Ultra High Speed Internet - 100Mbps
b) Monthly Data 300 GB
c) Jio Applications included.

There will be additional GigaTV set-top box for Tv content which will connect to same fiber cable providing:

d) Ultra high-definition entertainment on TVs.
e) Video Conferencing
f) Those with Giga Tv will also be able to make phone calls to Other TVs, phones & tablets running on Jio fibre networks.
g) Voice-Activated virtual assistance.
h) Virtual reality gaming.

Interface of Jio Router is user friendly:


Jio Plans for future: "Smart Home Accessories Suite"


It will includes TV camera, plugs, doorbells, Wi-Fi extender, and more. The accessories can be used to control the entire home via the MyJio application. Apart from the major connected devices, Jio is set to bring the smoke sensor, water leak sensor, siren, gas leak sensor, panic button, door sensor, and smart video doorbells. These have been designed to let users control and monitor their homes remotely using their smartphones. The prime purpose of the new launch is to expand the presence of connected homes in India.

The new devices will enable Jio users to control and monitor "every aspect" of their homes, including temperature, lighting, electrical appliances, gas and water leakage, motion detection, and opening and closing of doors and windows. The devices will also enable remotely caring for babies and elderly, the company said at the meeting.

Jio would be deploying its services first to those areas from where most requests will come. Jio is not charging anything for registration for Jio Giga Fiber Preview Offer. I am providing you easy steps to register below:

Easy Steps to register:

a) Open the website either on desktop, laptop or mobile  "https://www.jio.com/". (Users using Jio carrier can get the option in home page of MYJIO App).

b) Enter your Address where you want Jio Fibre to be installed.


c) Enter your basic details like Name, Mobile No. & Email Address & accept Terms.


d) Click Generate OTP. A code will be sent to the mobile number entered in step c.


e) Click Verify OTP & Proceed in the End.


Its was really simple to register to let Jio understand from which area demand is high. The high the number of registrations from a particular area, faster the process of deployment may happen in that area.

Jio Giga Fiber has big plans to sustain in the heavy competition and this makes it invest heavily in the broadband services including Gio TV Services where focus is to provide Ultra HD Entertainment on TV, video conferencing & smart home solutions.

Thanks a ton for reading my above blog. It would have made you curious to think about how Jio will bring changes in India. Leave your comments.We will keep you posted, as we receive more information.

Click More on Jio Giga Fiber: Click Here

Ajey Kumar Gupta
(Microsoft Exchange Admin)

Next Blog: Servers...Never stops?

Monday, August 27, 2018

DNS: How Google connects to its Server?

The Domain Name System (or DNS) converts human readable domain names (www.google.com) into Internet Protocol (IP) addresses (173.194.39.78).
Computers can only communicate using series of numbers, so DNS was developed as a sort of "phone book” that translates the domain you enter in your browser into a computer readable IP.

A Brief History of the DNS:

Several years ago, when someone has to visit the website, he had to know the "IP address" i.e., 127.34.55.66 of that website as computers are and were only able to communicate using numbers. It was long, hard to remember, and human beings in general, would rather work with names that are easy to remember rather than numbers, but computers would rather work with numbers.

Human Beings don't want to memorize the IP address of every website they visit, they would rather like to memorize things like Google.com, Paytm.com, Microsoft.com etc. So something was needed to translate from those words into IP addresses.

As we all know Necessity is the mother of invention, hence DNS was born. Domain name system, DNS accomplishes exactly what was required. Now if  a DNS server is queried to get an IP address of any domain, e.g., "abc.com"? It started responding with 127.34.55.66. The biggest problem of not to remember Ip Addresses was resolved.

How DNS was born?

In the early 1980’s, Paul Mockapetris came up with a system that automatically mapped IP addresses to domain names and DNS came into existence. This same system still serves as the backbone of the today's modern Internet.

The DNS is maintained by several organizations, including IANA (Internet Assigned Numbers Authority) and ICANN (Internet Corporation for Assigned Names and Numbers).

What DNS Servers hold?

DNS servers can hold many individual records. An individual record contains information about one Ip address. e.g., one name association with one Ip address. Records come in different types, which have different purposes, and may contain slightly different information. There's always a name and an IP address.

The most commonly DNS Records are mentioned below:

a) A record - An A/Address record/host record links a domain to the physical IP address of the server hosting the services.
b) AAAA record - which will give you an IPv6 version address.
c) MX Record - specifies a mail server responsible for accepting email messages on behalf of a recipient's domain mail servers. Lower the Number, higher becomes the priority.
d) CNAME Records - CNAME stands for Canonical Name. It can be used to provide an alternate name to a primary domain.
e) SRV Records - SRV records are often used to help with service discovery. For example, SRV records are used in Internet Telephony for defining where a SIP service may be found. It defines a symbolic name and the transport protocol used as part of the domain name, and defines the priority, weight, port and target for the service in the record content.

Till now we have understood that in DNS IP address (number) is mapped to domain name (which humans can understand), but where is this information stored? Is it on Name servers?

Name server (NS Record) records determine which servers will communicate DNS information for a domain. Most name servers provided by hosts look something like ns1.yourhostdomain.com.

The Authoritative nameserver is the DNS Service Provider which can also be a DNS Registrar (like GoDaddy that offers both Domain Registration & DNS Service for that domain).

Practical Working of DNS:

When someone tries to open www.google.com, the browser will ask your local ISP's DNS Server (which stores cache) if they have the DNS records for that domain cached.

As it’s a popular website like google.com its likely to have the record (Ip Address of Google.com) in ISP's cache. In this case, you would skip the rest of the DNS lookup process as browser got the Ip Address to open the website. These records remain for a certain period of time in the cache defined in the TTL (Time to Live) & can be anywhere between 30 seconds to a week duration.

What if the record we are looking for isn’t cached? Then the ISP's DNS Server will send the request further to the Root Hint servers to look for Top Level Domain (.com, .org etc.) which will point to the Authoritative DNS Server (cloud DNS) where all records for that domain would be hosted.

Lets simplify it by a real world example - Suppose we registered a domain abc.com with GoDaddy (we will also be taking DNS Services from it). So when a user being in any part of the world opens abc.com in the browser, it would try to reach abc.com web server using its stored Ip Address from its connected ISP's DNS Server cache. In case if Ip address is not present in cache, then the request will be forwarded to Root Hint Servers which has information of all Top Level Domains (all .com domains) that this domain is registered with GoDaddy and the request will come to abc.com domain Registrar GoDaddy where Name Server would be having all other records hosted for domain "abc.com". Hence, "A" record having the IP Address 127.34.55.66 of domain abc.com will be provided to the browser & website will open.

Note: There are 13 root hint servers in the world which keeps information of all Top Level Domains (.com, .org, .net etc) and would redirect to the Domain Registrar. From there it will look Name Server Records and will reach to the server where all DNS Records will be placed and from there A record will be fetched and sent to the user looking for it.

Short Summary:

When user opens Google.com, how it reaches Google Server?

a) User types “www.google.com” into your browser.

b) The browser uses DNS to look up the nameservers for www.google.com in ISP's DNS cache.

c) The nameservers ns1.google.com and ns2.google.com are retrieved from domain registrar of Google.

d) The browser uses the nameservers to look up the IP address for www.google.com.

e) The browser gets the response: “172.217.161.14”

f) The browser sends a request to 172.217.161.14, including the specific page you’re trying to reach.

g) The web server hosting your website sends the requested page to your browser.

I know trying to understand DNS for the first time is a little tricky & complicated. However, it could not be more simple than this. As from my personal experience, it takes around several months for a technical mind to understand the working of a DNS. I tried my level best to keep the explanation simple. I highly recommend you to read twice, thrice or as many times till you understand the working logic behind it.

Read more: Click Here

Thanks a ton for reading my above blog. If you got to know something new & enjoyed my post, kindly post it in the comment section below.

Ajey Kumar Gupta
(Microsoft Exchange Administrator)

Next Blog: JioGigaFiber The Next Generation Broadband Service.

Friday, August 24, 2018

How to connect Powershell to Office 365 after enabling Multi-FactorAuthentication?

If a Global Admin want to use multi-factor authentication (MFA) to connect to Exchange Online PowerShell, you can't use the instructions at Connect to Exchange Online PowerShell. MFA requires you to install the Exchange Online Remote PowerShell Module, and use the Connect-EXOPSSession cmdlet to connect.
From long time an Office 365 Global Admin's favorite tool is Powershell. He can automate, perform numerous tasks which are not possible via GUI. As from our last blog we came to know that a verification code is sent to User's Mobile after MFA is enabled.

Question in mind ! 

Why can't we use the same instructions given in Connect to Exchange Online PowerShell for MFA enabled user?  
Let me explain you. When a MFA enabled User tries to connect Powershell, it cannot prompt you to enter the Security Code. Hence, Microsoft provided the separate option to download Exchange Online Remote PowerShell Module from Exchange Admin Center & use it to perform all Powershell tasks.

Practical: (Takes maximum 30 seconds to perform all steps):

a) Open portal.office.com in Internet Explorer & login with the Global Admin or User (Do not use Google Chrome or Mozilla Firefox).


b) Click Admin Center - Exchange.

c) A new page will open. Click Hybrid at bottom left of page.

Note: You  require .net framework 4.6.2 for Exchange Online Remote PowerShell Module to install. Click here to download. Don't forget to restart the pc after installation.

d) Click Configure to download Exchange Online Remote PowerShell Module for multi-factor authentication.

Once installation will be completed, a black color Powershell Window will appear automatically.

e) Final Step - Run the Powershell Command:
Connect-EXOPSSession      
(Enter the Global Admin Credentials).

Now Global Admin will be able to connect to Office 365 using Exchange Online Remote PowerShell Module & will be able to perform all the tasks.


MFA provides extra security to any account in the cloud. Hence most organizations takes advantage of this feature so that their users credentials should never get compromised and important data would be kept safe in the cloud.

Read More: Click Here

I thank you by heart for reading my above blog. In case something is missing or not clear, kindly post it in the comment and I will try to respond asap.

Ajey Kumar Gupta
(Microsoft Engineer)

Next Blog: DNS - How Google connects to its Server?


Thursday, August 23, 2018

Why organizations moving to Office 365 prefer MFA for Security?

Why do we use MFA
If by any chance a corporate user's credential are compromised, login to his account will become  impossible until that user approves it from his phone. Hence Microsoft recommends that it should be used in the corporate world for enhanced security. It safeguards corporate data & applications.

Short Steps (takes maximum 1 minute to complete all steps) :

a) Portal.office.com - Users - Active Users - Select the User. Click Manage Multi-Factor Authentication at bottom of the page.
b) Select User - Enable Multi-Factor Authentication - Enabled.
c) Now when the user will try to login, he will be asked to fill his details e.g., mobile number. Educate him in an email about it to choose options like Authentication Phone (best & simplest) or Mobile App (requires Microsoft Authenticator App in Mobile with working internet) - Finish.
d) When user logs out & login, if Authentication Phone is configured, he will receive a simple verification code. If Mobile App is configured, he has to choose Approve or Deny. Selecting Approve will automatically let the user login to his O356 Account.

Practical
a) Login to portal.office.com with your Organization's Credentials.
b) Click Users - Active Users - Select the user on which you want to set up MFA. Click Manage Multi-Factor Authentication at the bottom of the page.


c) Select the user for whom you want to enable Multi-Factor Authentication. At the Right Pane click Enable. You can enable MFA for bulk users at once also.


d) Click Enable Multi-Factor Auth to enable it.


Click Done.


Congratulations ๐Ÿ˜Š you have enabled Multi Factor Authentication for a user. The activity from admin end is over. I hope it will be a child's play next time. Now end users needs to be educated about completing MFA steps according to their preferences.

Result after enabling the MFA: Share the link http://aka.ms/MFASetup via email to end users for completing MFA settings according to their own preferences. If they miss your communication, still they would be required to complete MFA as described below:

a) User login to https://outlook.office365.com/owa
b) User will be prompted to provide More Information Required about him.


c) He is asked to choose 3 optionsAuthentication Phone, Office App and Mobile App. 
Simplest Option is "Authentication Phone" where user enters his personal mobile number and receives a code on it to verify his true identity.


A code will be sent to the mobile phone entered. In the last an App Password is also provided to use with Outlook.


Other Optional steps in Additional Security Verification Page: 

The Office phone can be setup with the help of office Admins.

Mobile App: It uses Microsoft Authenticator App to approve or provide codes used for MFA. During it configuration the user also adds Personal Phone number like in Authentication Phone. It's condition is it will only work if Mobile Internet / Wi-Fy is on in mobile. It may happen the user may remove Microsoft Authenticator App or no internet in mobile, so in that case Phone Authentication is used as an alternate which sends a text code on mobile using User's Carrier e.g., Airtel, Vodafone, Jio etc.)


Configuring Mobile App is very easy: Select Mobile App (shown above) - choose Recieve Notifications for Verification - Click Setup. Simultaneously Download "Microsoft Authenticator" App in mobile from Google Play Store.


Open the app in mobile & click 3 vertical dots at top right of the app - Add Accounts & scan the bar code from the Setup screen. A new Account will be added in Microsoft Authenticator App.


While setting up Mobile App, it will also setup Authentication Phone in case mobile internet is not working.


In the end, it will provide the App Password for Outlook Connection. If user uses Outlook after setting it up, he may get a prompt to enter the password, so he has to enter this App Password. Note it down to enter afterwards.


d) More than 90% of corporate users choose only Authentication Phone option to receive simple text on mobile. Its completely the users's choice. Personally I prefer Mobile App where Microsoft Authenticator sends a popups on mobile screen to agree to deny.

Final Result: 

After completing the MFA Settings, lets see what happens when the user logins to O365: 
a) User login to https://outlook.office365.com/owa


b) If he had chosen only the Mobile Authentication method which mostly users do, he will get the text on his mobile as shown below.


c) If he had chosen Microsoft Authenticator App option he will get 4 different options:

  • Approve a request on my Microsoft Authenticator App - Gets a popup on mobile: Approve or Deny.

  • Use a verification code from my mobile app - Shows a code on mobile in Microsoft Authenticator app.

  • Text +XX XXXXXXXX72 - Sends a text code on mobile using Carrier (no internet required)

  • Call +XX XXXXXXXX72 - Receives a call from Microsoft & IVR will request to press # key to complete verification.


User can select any option from the above and he will be able to login immediately to his account.

Extra Notes: An app password, is a password that is created within the Azure portal that allows the user to bypass the Multi-Factor Authentication. All the Office 2016 client applications support multi-factor authentication through the use of the Active Directory Authentication Library (ADAL). This means that App Passwords are not required for Office 2016 clients.

Note: If you find that this is not the case, make sure your Office 365 subscription is enabled for Active Directory Authentication Library (ADAL). Connect Powershell to O365 & run:

Get-OrganizationConfig | Format-Table name, *OAuth* 
Set-OrganizationConfig -OAuth2ClientProfileEnabled:$true   (it will enable Active Directory Authentication Library (ADAL))

If you enjoyed my post, I bet you’ll have something to say! You always have an option to leave a comment below.

Part 1: Why only 5% Users fully secure their GMail Account? 
Part 2: Your One-Drive data is important. Secure it full-proof.

Thanks,

Ajey Kumar Gupta
(Microsoft Engineer).

Next Post: How To Connect To Exchange Online with MFA enabled user in Powershell?

Wednesday, August 22, 2018

Your One Drive data is important. Secure it full-proof.

Contd... from previous blog "Why only 5% users fully secure their Gmail Account?".

Its important to secure Emails & cloud storage in today's world. Microsoft offers three ways to set up two-step verification (MFA). You can use a secondary email address, phone number or you can also opt to configure an authenticator app. Once a two-step verification is set up, every time you sign in from a new location or on a new device, you'll be prompted a security code to prove that you're, who to say you are.

Practical: (Takes maximum 30 seconds to complete all steps):

1) How to Enable MFA for your Hotmail Account

a) Login to Hotmail.com or Outlook.com.
b) Click at Top right corner (your display name) and click "View Account".


c) Click Security - Update.

At the bottom of the page click "More Security Options".

d) It will ask your mobile numbers's last 4 digits associated with your Hotmail account's and will send a verification code on it.

e) Enter the code received on your mobile to open Additional Security Options.

f) Set up two-step verification - Proceed with on-screen instructions & click Finish.

Congratulations your two-step authentication is enable on your Hotmail account as well.

Lets quickly see the result as well: 

User opens hotmail.com or outlook.com & login with his username & password.


Now after enabling two-step verification, a notification will come on your mobile "Approve Sign-In Request ? Deny or Approve. Click Approve. You can also choose "Sign in Another Way" & will get below options to choose from:


a) Approve a request on my Microsoft Authenticator app.


b) Use a verification code from my mobile app


c) Text *********72


d) Email sk*******@gmail.com


The simplest among all above options is the third one where a code is sent to your registered mobile number with Hotmail Acount. However, you may select any above option. I have installed Microsoft Authenticator and selected first option & received below two options "Deny" Or "Approve" the user to login.


Once clicked on Approve, hotmail will allow to login after the 2nd authentication option will approve. In this way your Hotmail Emails, One Drive (max 15 Gb cloud storage) would have the most security enabled on it.


Optional Read: Microsoft Authenticator is a mobile app which give you the Approve Or Deny the Sign-In in the notification of your mobile. The simplest option is the third option i.e., text where a code is sent to your mobile and you enter the same code on your computer and will be able to login.


Note: If you see an “incorrect password” error on Mail App in Mobile or Oultook or any other device after you turn on MFA (two-step verification), but you’re sure your password was correct, that means you'll need an app password for that app or device.

Some apps (like the mail apps on some phones, Outlook) or devices (like the Xbox 360) cannot prompt you to enter the Security Code when you try to sign in. Hence they require an App Password. To generate the App Password for Hotmail Account click here. Click "More Security Options" at bottom of the page.

Click On Create a New App Password. The next screen will show auto-generated password which can be copied and pasted in the Outlook Hotmail Account popup window after enabling MFA.


App passwords are only available if you use two-step verification. If you don't have two-step verification turned on, you won't see the App passwords section on the Additional security options page.


Thanks a ton for reading my above blog. If you have any queries, suggestions or feedback please post it below and I will try to reply asap.


To Be Contd...


Thanks,

Ajey Kumar Gupta.
(Microsoft Engineer)


Why only 5% Users fully secure their Gmail Account?


Part 1:
Recently, close to 300 million online accounts were compromised. 24+ million of those accounts were Gmail, spreading a mass epidemic of fear among internet users everywhere.

In today's world where our most of the important stuff is kept safe on the cloud storage (emails, documents, pictures in google drive). What all can you do if someone may guess, steal or crack your password. Lets quickly find out the best way to stop it from being compromised at any cost.

Introduction: 
Now a days every E-Mail Account comes with an additional security feature called "Multi-factor authentication" (MFA) which authenticates an account by validating two or more “factors,” that are particularly unique to you. It becomes nearly impossible thereafter to hack or steal the account's information as it will truly verify that user who tried to access the account is the same user who they say they are.

You can enable MFA for your GMAIL, Yahoo, Hotmail or an Office 365 Exchange Online Account.


Practical: (Takes maximum 1 minute to complete all steps):

1) How to Enable MFA for your GMAIL Account? 
a) Open Gmail.com & login into your account.

b) Click Account Name at Top Right Corner and click "Google Account".

c) Click on "Sign-in & Security".


Scroll down & find "Password & sign-in method heading" & click on: "2-Step Verification" - Turn it 'On'. This direct link should also take you there.


d) Enter your password to re-confirm. On the next screen click "TRY IT NOW".


e) A Message will display on your mobile stating "Trying to Sign-In from another computer". Tap on Yes option on your Mobile.

f) Set Your Mobile number & the option such as Text Message or Phone Call to verify your identity.


g) Finally, click on Turn On to confirm that you want to enable the 2-Factor Authentication for Gmail for tight security.


Congratulations, :) now your MFA is enabled and your account is fully secure. Now lets try to login into Gmail and see what happens. Enter your username & password on the desktop or laptop. 

Gmail will send you the prompt on your mobile to confirm your authenticity. See carefully.


A new message will appear on your Registered Mobile number with Gmail Account - "Is it you trying to Sign In". Once you click on Yes, then only you will be able to login into Gmail.


For you your Emails & stuff stored in Google Drive may be very important & you don't want to loose it at any cost, hence I recommend you to enable MFA. The purpose of the above blog is to make you aware of the security feature which is under-utilized till now.

If you use Gmail Account in your Outlook, it may ask you to enter the App Password as it cannot prompt you to enter the Security Code when you try to sign in. To generate the App Password for Gmail Account click here (https://security.google.com/settings/security/apppasswords).

Easy Steps for Generating App Password - Create the app password by visiting the above link & paste that password in Outlook Popup window. Once you enter the app password instead of Gmail Account's Password, Outlook will start downloading the Emails for Gmail Account.


After enabling MFA, Outlook uses "App Password" to connect to Gmail Account. And you can regenerate it very easily from the same above steps.

Thanks a ton for reading my above blog. If you have any comments, suggestions, or feedback please spare a second to post it.


To Be Contd.....


Thanks,

Ajey Kumar Gupta
(Microsoft Engineer)

Next blog: What Microsoft is doing under the Sea?